If you care about privacy, security, and a better browsing experience, you’ve probably come across DNS at some point.
DNS (Domain Name System) is essentially the phonebook of the internet, translating human-readable domain names into IP addresses.
Most people don’t give DNS a second thought.
It’s one of those invisible parts of the internet that just works. But what if I told you that the default DNS you’re using could be tracking your every move or leaving you vulnerable to malware?
NextDNS isn’t just another DNS service. It’s a next-level DNS solution that blocks trackers, ads, and malicious websites right at the DNS level—before they even reach your browser.
It’s like a privacy shield for everything you do online.
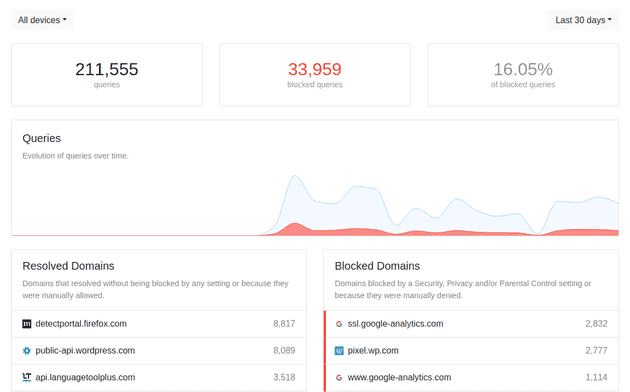
And on top of that, it offers real-time analytics, so you can actually see what’s going on with your DNS traffic.
Here’s why you should care.
- Privacy Protection:
NextDNS blocks all those annoying trackers that follow you around the web.
Say goodbye to advertisers knowing everything about you.
- Security:
It also keeps you safe from malicious websites, phishing attacks, and malware.
- Custom Blocklists:
Want to block specific sites or categories of sites?
No problem. You can create your own rules.
- Analytics:
It shows you exactly which sites have been blocked, so you can make more informed decisions about your digital habits.
Setting Up NextDNSOkay, so you’re sold on the idea of better privacy and security. But how do you actually set it up?
Spoiler: It’s easier than you think.
Step 1: Create an Account
First, head over to NextDNS and sign up for an account.
It’s free to start, and you can always upgrade later if you want more advanced features (like more blocklist options or more traffic).
Once you’ve created your account, you’ll be directed to your NextDNS Dashboard.
This is where all the magic happens.
Step 2: Configure DNS Settings
NextDNS gives you step-by-step instructions for setting it up on different devices. Here’s how to do it on some common platforms:
Windows
Open Network Settings and select your network adapter.
In the DNS settings, enter your two NextDNS IP addresses:
45.90.28.0 and 45.90.30.0. These are just examplesSave the settings, and you’re done!
Android
Go to Wi-Fi settings and select your network.
Under DNS settings, replace the default DNS with the NextDNS addresses.`
iOS
Open Safari on your iPhone or iPad.
-
Visit the NextDNS Setup page.
-
Under the “Configuration” tab, select “iOS”.
-
Tap “Install Profile” to download the NextDNS configuration profile.
- When prompted, tap “Allow” to download the profile.
-
Go to Settings > Profile Downloaded (or General > Profile).
- Tap Installin the top-right corner.
-
Enter your device passcode, if required, and tap Installagain.
- Tap Done to complete the installation.
Or in my case, Unify
- Go to Internet -> WAN Settings
- Scroll to DNS Server, uncheck Auto, and paste your NextDNS address
Step 3: Set Up Custom Blocklists
Because Defaults Aren’t Enough
NextDNS comes with solid built-in filters, but sometimes you just want more control. Maybe you want to block annoying pop-ups on a sketchy streaming site. Or stop apps from phoning home to who-knows-where. Or just make your browsing faster and cleaner.
That’s where custom blocklists come in.
What’s a Blocklist, Anyway?
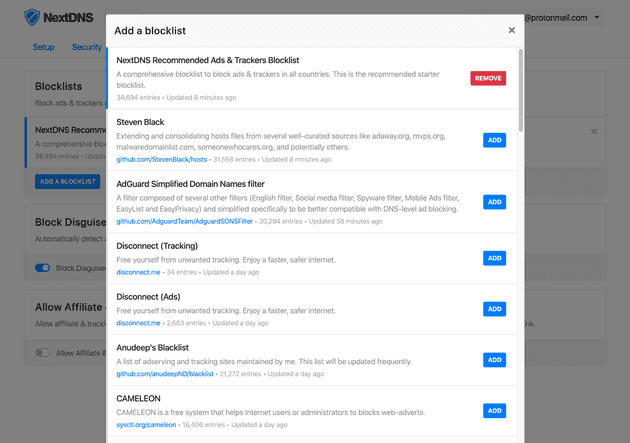
Think of a blocklist like a blacklist for the internet. It’s just a long list of domains that your DNS won’t resolve—meaning they never load. No more ads. No more trackers. No more shady sites trying to steal your data.
The Best Blocklists (So You Don’t Have to Google Them)
There are a ton of blocklists out there, but here are some of the best ones:
-
🛡️ Hagezi Pro++
Great balance of privacy, security, and ad-blocking.
-
🚫 OISD
Lightweight but effective, perfect for most users.
-
🔒 1Hosts Pro
More aggressive, ideal for hardcore privacy fans.
-
📵 Steven Black’s Blocklist
Well-maintained and beginner-friendly.
Want something even stronger? Stack multiple lists together. Just don’t go overboard—you might block half the internet.
Step 4: Analyze Your Data
The coolest part about NextDNS? The analytics.
It’s like having a detailed report card on your internet usage.
You can see which domains are trying to track you or serve you ads, and you can adjust your settings accordingly.
Using NextDNS with Your Router
Want to protect every device on your network?
You can set up NextDNS directly on your router. This way, all your devices—phones, laptops, smart TVs—will automatically use NextDNS without having to configure each one individually.
Just log into your router’s admin panel, find the DNS settings, and enter the NextDNS IP addresses.
That’s it.
Your router will handle all the DNS queries for every device connected to your network.
Is NextDNS Worth It?
I’m going to keep this short: Yes, NextDNS is absolutely worth it.
It’s one of the easiest ways to level up your online privacy, security, and browsing experience.
With customizable blocklists, real-time analytics, and a simple setup process, NextDNS is a no-brainer for anyone who wants more control over their internet activity.
Whether you’re a privacy-conscious individual or just tired of being tracked, it’s a tool you should consider using.
You can set it up in just a few minutes and forget about it. It’ll run silently in the background, blocking ads, trackers, and malware while you enjoy a safer, faster internet.
So, what are you waiting for?


